Editing View
The interface for creating, editing and testing workflows
Introduction
Workflows can be constructed and tested in "editing view". Modules are assembled into a sequential list, with parameters for each displayed when the corresponding module name is clicked. It's also possible to control which parameters are visible to end users via processing view . In editing view, workflows can be manually run one module at a time or initiated for a full run in the same way as in processing view.
Details on constructing and editing workflows can be found in the creating workflows guide.
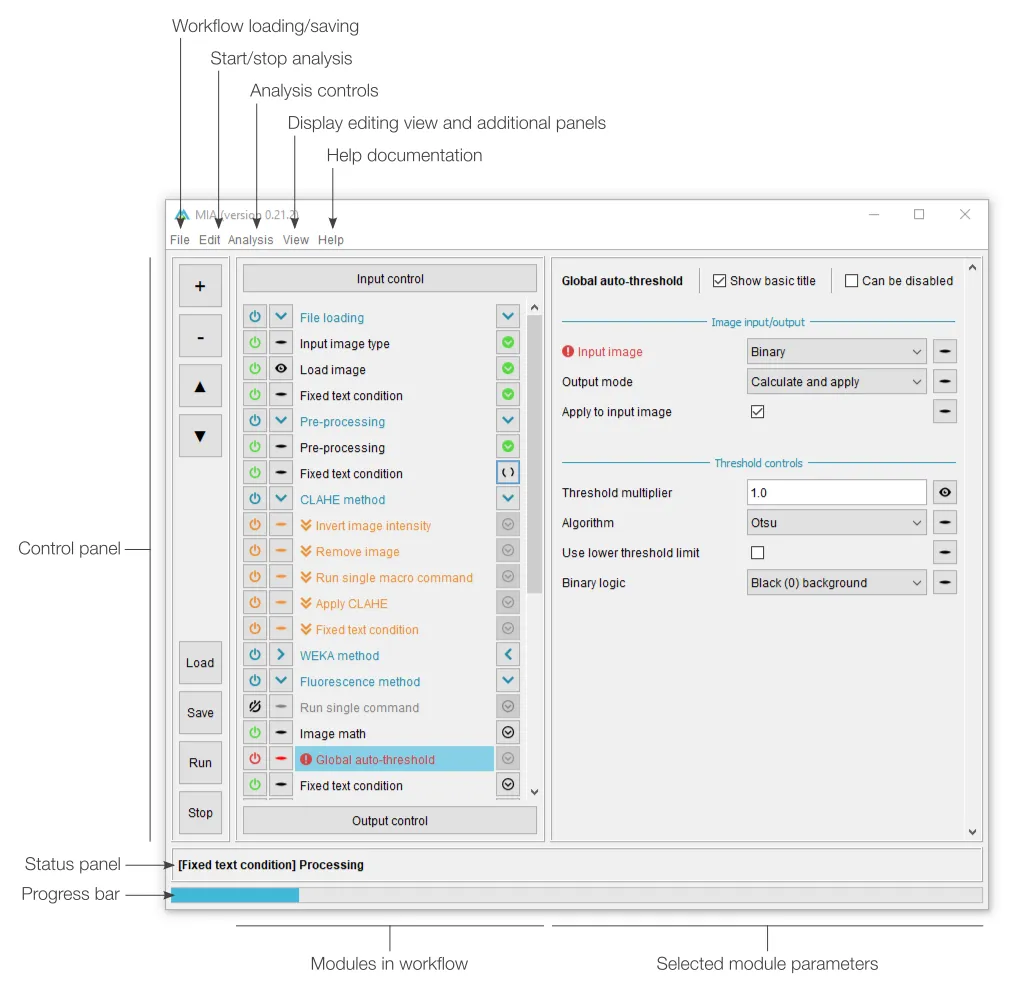
Workflow controls
The left-most section of editing view is split into two sections. The top half deals with adding, removing and sorting modules in the current workflow, while the bottom half offers shortcuts for workflow handling (e.g. loading and saving).
The + button will open a menu listing all available modules sorted by category. Selecting a module will insert it into the current workflow (see "Modules in workflow" below). If any module is currently selected in the workflow, the new module will be inserted immediately after it, otherwise, it will be added to the bottom of the list. Similarly, the - button will remove any selected modules (note: multiple modules can be selected from the current workflow). The ? and ? buttons can be used to move modules around in the workflow. A full list of modules and descriptions can be found in the module documentation .
Existing workflows can be loaded from .mia files using the "Load" button and saved with "Save". If the workflow has been loaded from a .mia file or has been saved previously, the "Save" button will overwrite the existing file. To save to a new file, please use "File > Save as...". A full analysis run can be started using the "Run" button. This will run the workflow on the file specified in "Input control" and is equivalent to starting an analysis from "processing view". The "Stop" button will terminate any active analysis runs.

Modules in workflow
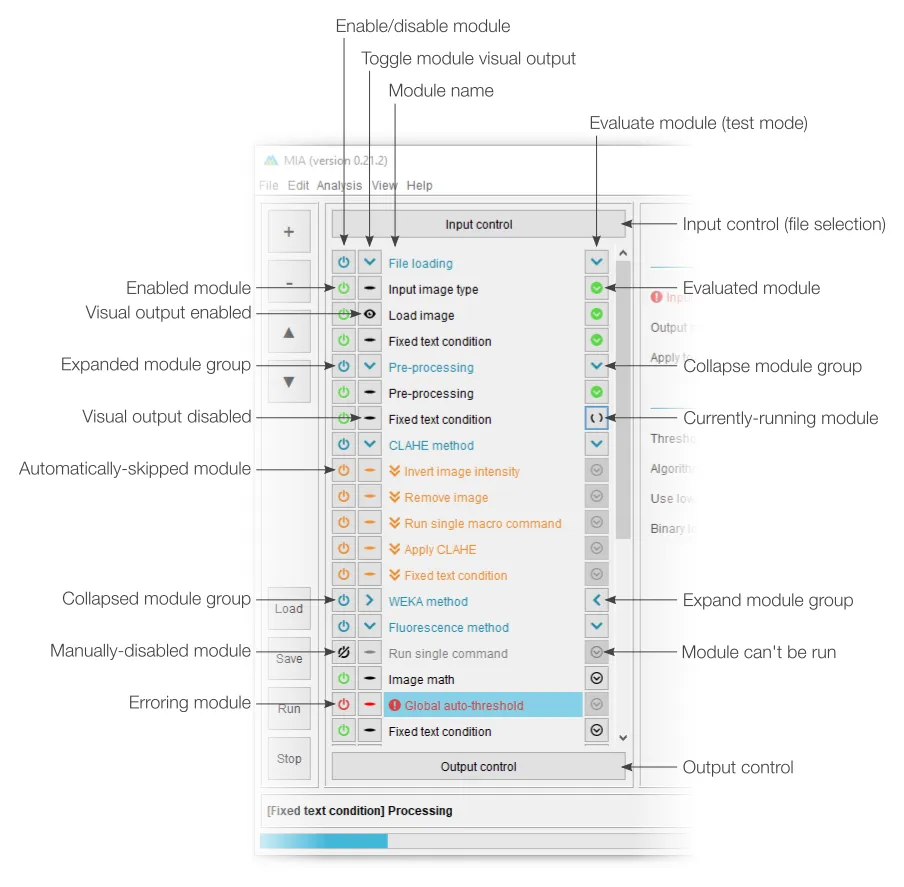
Modules forming the current workflow are assembled into a sequential list, with the first to be evaluated at the top. A pair of fixed modules, "Input control" and "Output control", are always present at the top and bottom of the module list. These are concerned with selecting the file(s) to process and exporting results, respectively.
Each module can be enabled and disabled using the associated
![]() and
and ![]() buttons, where a strike-through indicates the module is currently disabled. Most modules are
also able to display an immediate visual output when they have been evaluated, this visualisation
can be toggled using the
buttons, where a strike-through indicates the module is currently disabled. Most modules are
also able to display an immediate visual output when they have been evaluated, this visualisation
can be toggled using the ![]() (visualisation enabled) and
(visualisation enabled) and ![]() (visualisation disabled) buttons.
(visualisation disabled) buttons.
Module parameters can be edited by selecting the associated module name (see "Module parameters" below). Modules can be moved within the workflow by selecting their name and dragging them to a new position. Multiple modules can be moved by holding down the Ctrl or Shift keyboard buttons or dragging the mouse over multiple module names. Modules can be assigned nicknames by right-clicking the name and selecting "Rename".
Primarily for the purpose of testing, workflows can be run manually, one module at a time
using the evaluation buttons. The ![]() button indicates a
module not yet run,
button indicates a
module not yet run, ![]() a module currently being evaluated and
a module currently being evaluated and
![]() a module previously run. Editing a module will
cause any previously-evaluated modules downstream to reset to the "not yet run" state.
a module previously run. Editing a module will
cause any previously-evaluated modules downstream to reset to the "not yet run" state.
Separators can be used to break modules down into groups. Groups can be collapsed and
expanded using the ![]() and
and
![]() buttons on the associated separator row. All modules
of a group can also be simultaneously enabled or disabled using the associated separator
buttons on the associated separator row. All modules
of a group can also be simultaneously enabled or disabled using the associated separator ![]() button.
button.
Any modules identified as containing errors (e.g. missing input images or objects) will be
shown in red with the ![]() icon. It is also possible to have optional
modules which are disabled under specific conditions (see
workflow modules
). Skipped modules are highlighted in orange and given the
icon. It is also possible to have optional
modules which are disabled under specific conditions (see
workflow modules
). Skipped modules are highlighted in orange and given the
![]() icon.
icon.
Module parameters
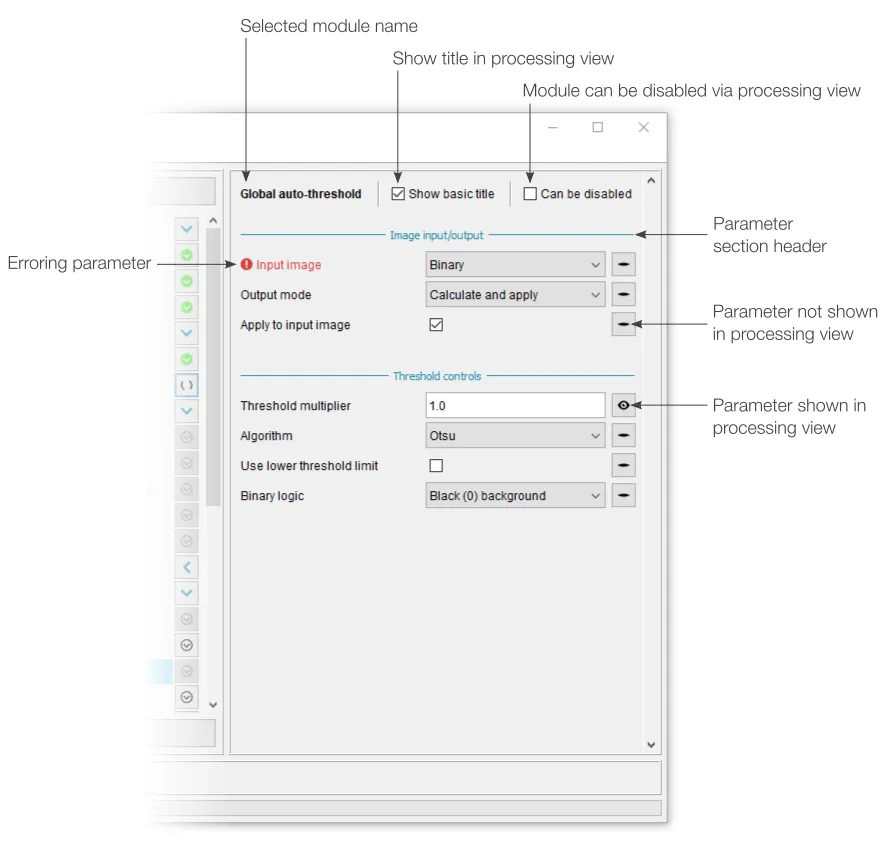
Each module has a set of associated parameters, which can be accessed by clicking the relevant module name in the module list (see "Modules in workflow"). These parameters are broken down into sections based on their common actions. The parameter control will depend on its type (e.g. input objects list objects available in the workspace).
By default, no modules are visible to the end user in
processing view
. Modules can be made editable in processing view by toggling the associated visibility button,
with ![]() indicating a visible (editable) parameter and
indicating a visible (editable) parameter and ![]() one that will not be visible. Modules with visible parameters will also have their name displayed
in processing view, unless "Show basic title" is unticked.
one that will not be visible. Modules with visible parameters will also have their name displayed
in processing view, unless "Show basic title" is unticked.
Similarly, entire modules can be made optional by selecting "Can be disabled". When
selected, the module title will be displayed in processing view along with an
![]() or
or ![]() icon (depending
on state of the module).
icon (depending
on state of the module).
Any modules with identified errors will be highlighted in red along with the
![]() icon.
icon.
Module search
An optional search panel can be enabled by either selecting "Search for module" from the "Add new module" (+) menu or by going to "View > Show module search". Here, modules can be searched based on words that may appear in the module name, module description or associated parameter descriptions. The module search will always look at module names, but module descriptions and associated parameter descriptions can be optionally included using the tick boxes.
Multiple search terms can be provided (e.g. "overlay outline"), with identified modules only needing to match one of the terms. Mandatory search terms can be included using quotation marks - all identified modules must include at least one instance of such terms.
Found modules are listed below the search controls, with the best matches (those including most search terms) at the top. Each identified module can be directly added to the current workflow using the associated + button.
